Sunday, August 7, 2016

I've been MIA, I'm not dead!

Hey y'all! 
Man, I feel like it has been ten years since I have blogged! I have been so super busy that I just haven't had the time... so, let's play catch up! 
  1. I have been so super busy with my business that it has been so hard to push all of my attention here because at the end of the day after all of my social media'ing for it, I just want to turn off my phone and computer for the rest of the night and spend time with Mr.Hooah when he gets home.
  2. School........HAVE MERCY! I seriously didn't think I was ever going to see the light at the end of that tunnel but you guys, I finally graduated and have never been more proud of myself for that because well, I DID IT!!! That and I'm old, it was about time! Haha.
  3. My business I keep speaking of....is actually my old in-home business that I merged with my new business. I decided to take a leap of faith after finally trying some of the amazing merchandise from LuLaRoe and became a consultant. I am my own boss full-time. I make more than what I would if I were actually working the career I went to college for. Crazy, right?! And with Mr.Hooah's new schedule, I have the freedom to be able to take time (when he gets time) so we can actually spend it together! 
  4.  Mr.Hooah's new job...OY VEY, let me just tell you that is his new orders for the next three years (only two years now when October hits! Thank You sweet baby jesus!) have been an...INTERESTING adjustment. His schedule is so very demanding. Working weekends and long hours has been so difficult for us. On the bright side, we didn't have to PCS to god knows where! 
Ok, so that's pretty much it! I think that was short but explanatory enough! I have been cooking new recipes but am never camera ready as it is always upstairs for inventory purposes. I will try to do better and post them over the next week or two! I haven't forgotten about y'all! I have been getting new notifications for people viewing my page and today I thought I would make the time to sit down and explain myself since you guys were taking the time to come to my page...that I've just been MIA, I'm not dead! Lol. Furthermore, if any of you guys love LuLaRoe, please feel free to come browse and shop with me online at: LuLaRoe CiCi Appel's VIP Shopping Group! 
 photo article-1141243-1451590993.95_zpspaecqggq.png
 The buttery-soft leggings will change your life! I'm just sayin'! ;) And I will post pics of my second guest room turned office makeover, so stay tuned for that as well! You guys are all so amazing!

Until next time....
-XO

Friday, February 26, 2016

Sweet and Spicy Bacon Wrapped Chicken

First of all, let me say that this is not...I repeat... IS NOT, a healthy recipe. Lol.

Mr.Hooah has had such a long week and this Sweet and Spicy Bacon Wrapped Chicken is one of his favorites... So, myself being the best wife ever, thought he deserved something super yummy for dinner tonight! He was super excited about it when I texted him what we were having and he definitely let me know that he let our "temporary-roomie" know (I'm telling ya', any of his soldiers that ever needs a place to stay, our casa is always open!) that we are having:
 "CHICKEN...WRAPPED IN BACON...'MERICA!!!" 

You guys, I can't even...Hahaha. 

But on a serious note, our roomie is SUPER picky. He likes EVERYTHING plain. He is pretty much just a "meat and cheese only" kind of guy. And hey, that is ok because this recipe will even be liked by those who are just as picky as he is!
 But I mean, let's be honest, WHO DOESN'T LOVE BACON?! ESPECIALLY WHEN IT IS WRAPPED AROUND CHICKEN!?!

This chicken is seriously so yummy and is definitely something worth using your cheat-meal on!
I am not sure where I originally adapted this recipe from as it has been in my recipe book for several years now, but kudos to whomever originally came up with it and brought this delicious goodness into my life! 
I like to imagine the person who thought to make this recipe as being some guy with a bald eagle tank top on, wearing one of those beer helmets who drives an old transam with an American flag painted across the top...haha, maybe I should cut back on the wine right about now! :)

I am serious though people, the tender seasoned chicken wrapped inside the crispy bacon with the sweet brown sugar coating outside...OH. MAN. FOODGASM! LOL! If you decide to try this, it is great paired with a loaded baked potato or mac & cheese! I have even sliced it up on top of a salad too! Tonight I decided to not overload us on carbs so I'm just going to pair this with jalapeno mac and some garlic green beans. Also, as a side note, I know this is called "Sweet and Spicy" but honestly it isn't too spicy with the seasonings it calls for so if you were wanting to add a little kick like I usually do, sprinkle in a little cayenne or crushed red pepper flakes! 
This recipe is so super easy and cheap to make!

Enjoy you guys, and don't blame me when you get addicted after the first bite! ;)

-XO


Sweet and Spicy Bacon Wrapped Chicken
1 pk. of skinless, chicken tenders
1 pack of bacon
1 TBSP. chili powder
1-2 tsp. garlic powder
1-2 tsp. black pepper and salt
 1 c. brown sugar, sprinkled on a plate

  • Pre-heat oven to 400'...
  • Give the chicken tenders a quick rinse and then use a paper towel to pat dry a little. Mix together the chili powder, garlic, salt and pepper in a small bowl. Sprinkle spice mix all over the chicken tenders. 
  • Foil a baking sheet and spray with non-stick. Take each tender and wrap with one piece of bacon, I usually do this one at a time so it doesn't get crazy messy. Then roll it around in the brown sugar that you sprinkled on the plate. (I like to press mine down into the sugar so it gets a good coating of the brown sugar, if you need to add more brown sugar to the plate, you can.) Place each piece on the baking sheet a little bit spread apart.
  • Bake for 30-40 mins or until chicken is cooked through. At this point I like to turn the broiler on and broil on each side for a few minutes until the bacon crisps up as crispy as we like it. Then let cool a little and serve. 
  • TIP: I like use a a cookie cooling rack to put on top of the foiled pan to cook these on so that all the grease drains off and then the bacon gets crisp on both sides without having to continuously turn or broil it!

Tuesday, February 23, 2016

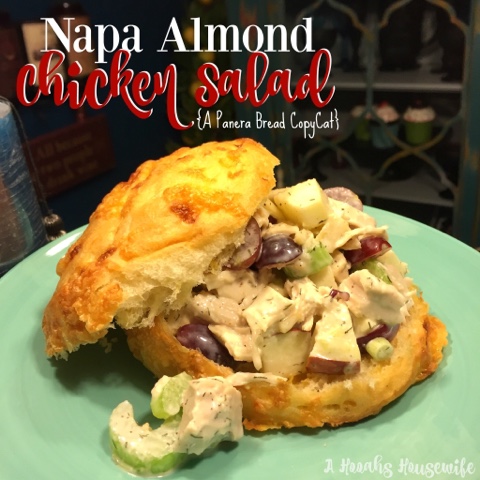
Napa Almond Chicken Salad---A Panera Bread Copy Cat


Can I just say that it is ALMOST March and that this year already needs to slow down?!

Ok, but let's be honest tho... I am NOT complaining about it almost being Spring, or the fact that summer is right behind that and all the warmer weather that that entails! Because I don't know about you guys but I am SOOO over the colder weather and ready for some sunny sunshine goodness!

I have been slacking a little on posting as some of you have noticed. I have been SO busy and I do apologize! It's not that I haven't wanted to blog a post or two, it's just that I have been trying to complete my office upstairs and starting the process of merging two of my in-home businesses. Then I had some health issues arise and I have just been too tired to do much of anything! 

With that being said though and all this talk of Spring, I decided to whip up this yummy Panera Bread copycat recipe: Napa Almond Chicken Salad... 
1. Because it is so easy-peasy.
2. Because it is not only healthy, but DELICIOUS!

Anyone who knows me personally, knows just how much I LOVE the chicken salad from Panera! Man, I could eat there everyday but that gets pricey so my search for a close replica of the chicken salad began and this is my go-to recipe for it when I am craving Panera.You can find the original recipe over at Two Red Bowls and if you haven't checked them out yet, you must, lots of great stuff!

Mr.Hooah and I absolutely LOVED this on cheddar rolls we got from one of our local bakeries! I promise that if you love a good chicken salad, that this is definitely the recipe you'll want to jot down in your recipe book!

-XO for now and thanks to those of you who have checked in on me,
 it means more than you know! 

Napa Almond Chicken Salad
 (A Panera Bread CopyCat)
2-3 chicken breasts, boiled, then shredded or cubed
3 stalks celery, chopped
3 whole green onions, chopped
2 c. grapes, halved
1 small apple, diced
3-4 TBSP. Mayo
2-3 TBSP. Greek yogurt (or you can use sour cream or plain yogurt, I preferred Greek Yogurt)
1/4 c. dill, minced
1/2 c. slivered almonds (they do not have to be Napa!)
1-2 TBSP. brown sugar
1 TBSP. lemon juice
salt and pepper to taste

1. Boil chicken breasts for about 10 minutes or until cooked through. Let cool, shred into large shreds with a fork, and then chop into bite-sized pieces.
2. Chop celery, green onions, grapes, and apple, and combine in a bowl with the chicken and almonds.
3. Whisk together mayo, Greek yogurt, brown sugar, lemon juice, salt, pepper, and dill. I like to add quite a bit of salt and pepper, because the chicken can be bland otherwise — probably about 1/2 tsp pepper and almost 1 tsp salt, but definitely taste as you go.
4. Pour over the chicken mixture and toss until coated.
 5. Let chill for a few hours or even overnight.

Tuesday, January 12, 2016

Homemade Turkey Sausage

There's all kinds of stuff you can make with turkey.... 

 *in my Forrest Gump voice* 
"You can make...Turkey Burgers, Turkey Bacon, Turkey Taco's, Turkey Spaghetti, Turkey Sausage...."

 Ok, Who else out there loves turkey as much as I do?!
I have ALWAYS been pretty picky when it comes to meats... I literally butcher our chicken breasts trying to cut away all the fatty/veiny parts when I prep chicken to cook it. And honestly, it has gotten to the point to where I eat so much chicken, I've gotten a little tired of it, so turkey burger is a second option for us! We shop on base at the commissary and as I have mentioned before, it is hard to actually get ground turkey there from time to time because so many people are eating it nowadays and it is so cheap on post. The same company that makes the turkey burger, also makes a Hot Italian turkey sausage and it has to be my FAVORITE meat to use for breakfast. It is amazing! You can add it to anything actually. I love to put it in my risotto as well but as I have mentioned the turkey burger is hard to get on post, and so is this sausage I speak of! When we go I usually stock up on them... Lately with eating healthier, I decided to look through an old diet cook book I have and I ran across a recipe for homemade apple turkey sausage. Mr.Hooah isn't a huge apple fan, so I didn't make the recipe from the book but I did use it as a guide-line!
Much to my surprise, these turned out great! 

I had all of the ingredients on hand already so it made this recipe even easier! 
It makes 16 patties for the price of one of the 8ct. boxes of Jimmy Dean's turkey sausage I buy at around $3.57! You can freeze these also and then just pop them onto a baking sheet lined with foil, broil for 7mins on each side and VIOLA! They're done! 
Easy peasy, right?! And honestly you can "spice" this any way you want it, it is completely customizable! I actually like adding in a bit of my newest addiction, FlavorGod seasoning... If you guys haven't bought any of these yet, you're seriously missing out and I don't even know what you're doing with your life! Lol. These can be bought over at www.flavorgod.com and is ground fresh daily!
 These seasonings are amazing and I swear by them! :)

Give this one a try, let me know if you love it or hate it... 
I'm pretty sure you'll love it tho! :)
-XO!
Ingredients:
1 (1.25lb) pack of raw ground turkey
4 TBSP soft bread crumbs (I used Progresso Italian)
1 TBSP dried sage (I used )
1/4 tsp. black pepper
1/8 tsp. sea salt
1/8 tsp. paprika ( I used smoked paprika)
1/8 tsp. ground red pepper 
Couple of dashes of nutmeg and garlic powder

  •  In a large bowl, mix together bread crumbs and seasonings; add in turkey and mix well. Shape mixture into 1/2in. thick patties.
  • Line a baking sheet with foil and spray with non-stick spray. AT THIS POINT YOU CAN COOK THESE OR FREEZE THEM (which is what I like to do so I can just pull them from the freezer whenever I'm ready to use them)...

Freezing: Place the patties (mine made 16) on the sprayed foiled pan, spaced apart, and stick in the freezer for about 1 1/2hrs. Remove and put patties in a freezer ziplock bag!  
  • Bake under broiler for 7 minutes on each side or until sausage is no longer pink and cooked through! (If cooking from frozen, no need to thaw, just put them on a foiled non-stick sprayed pan and into the oven they go for the same cooking instructions above!)

Sunday, January 10, 2016

Bacon Cheddar Dog Treats

Mr.Hooah & I have been making small changes to be healthier this year and so far so good!
 He has actually been trying a few new veggies and some have been a success! 
With all the healthy changes we have been making, I thought maybe our pups could use some too! 
As you all know, our pups are pretty much our kiddos, we definitely treat them as such. 
To say they're spoiled rotten is an understatement...these guys are past the point of no return, they're SO BAD. (HaHa!) When they do something bad (which is often, Lol) I always tell him,
 "Babe, they're just babies!" (LMAO!)

A year or two ago when the brand we were feeding them started having all these recalls on their dog foods/snacks, we immediately took them off of it and swapped them to another brand that has natural and simple ingredients. We can definitely tell a difference! Our dogs love it because it has real veggie pieces in it and our chi-weenie, Kizzie, no longer has the tummy problems she had when she was on the other brand. With our dogs being like our kids, we only want the best for them. I started looking into recipes so I could start making their treats and know exactly what is in them. I ordered some cookie cutters that came with a few other doggie type shapes (paw print, dog house, and a dog silhouette) but I stuck with the bone shape this time as it was my first time making these and our dogs love their bones.
Of course, Pinterest never fails and I got a wide array of recipes to choose from! After looking through several recipes and finally deciding, I made these Bacon Cheddar Dog Treats and they definitely did not disappoint the pups! These have to be their favorite thing ever right now! And since they're made with "people food" we actually got to eat one to test them out as well and let me just say, they taste pretty good! Lol.

I strongly urge everyone who has fur-babies to do research on the food they feed their pets...to swap to more natural dog foods to pro-long their life span... there have been so many awful recalls where plastic, metal, or other harmful substances were found in dog foods by bigger name brands.

 I promise your pups will appreciate and love you even more for these homemade treats... and they're so fun and easy to make!
Being able to eat them too, you could even share one or two together! Lol! 

 -X's & O's with woofs and wags...
from two furry little loves and myself!

Bacon Cheddar Dog Treats
4 strips Bacon (cooked crispy)
1/2 c. Shredded Cheddar Cheese
1 1/2 c. Milled Oatmeal
2 Large Eggs
Additional Milled Oatmeal
  • Preheat oven to 350.
  • Combine bacon, cheese, and oatmeal in mixing bowl. Allow mixer to break bacon and cheese up into little bits.
  • Add eggs to the dry mixture to form a thick sticky dough.
  • Dust surface of counter with additional milled oatmeal, to prevent sticking.
  • Roll dough out to approximately 1/4 of an inch. Use cookie cutters to cut out desired shapes.
  • Bake treats on a parchment paper lined baking tray for approximately 20 minutes (slightly longer if treats are larger). Treats will be a pale-ish brown when they're ready.
  • Allow to cool completely before feeding to your pet.
***Note: I just used my food processor and quick oats to make the milled oatmeal, I also put my bacon in with it to chop it up!

Monday, January 4, 2016

Teriyaki Chicken and Rice Casserole

I feel like, if I ever met Yoda, he would say, 
"The love for Asian food, strong in this one is...Aaaauuummmm!"

Haha, how nerdy am I, right?! 

But for real, as I have mentioned before, I am half Korean so I have a natural love for Asian foodage! I love sushi, bulgogi, kimbap, all things rice, black pepper chicken, general tso's chicken...man, the list goes on for days I tell ya'! 

This Teriyaki Chicken and Rice casserole that I made tonight was SO stinkin' easy that the ease of making it alone, was enough to make me want to add it to our meal plan! And on top of this being so easy-peasy, the taste was phenomenal and this is actually pretty cheap to make! I have had a lot of teriyaki dishes in my day, usually I just buy the sauce instead of going the homemade route, but the sauce in the recipe has to be hands-down THE BEST teriyaki sauce that I have ever made! And the fact that this dish has all these veggies makes it even more of a plus! Mr.Hooah loved that it had actual pineapple in it as well! We with that being said, we're definitely sold on this one! I added this from EmilyBites of course, and as always, it did not disappoint! It is also great as leftovers the next day! By the way, this recipe along with all of her other recipes, are WeightWatcher friendly! It is healthier than take-out and you can honestly customize it any way you please; Different veggies, etc... It is healthier and filling, we absolutely LOVED this one! 

SHOUT OUT: 
Thanks Emily, though you probably do not even know me from Adam, for making your recipes and blog so awesome that I am always cooking something new and delicious! :)

-XO
 

Teriyaki Chicken and Rice Casserole


¾ c. low-sodium soy sauce
½ c. water
1/3 c. packed brown sugar
1 TBSP. honey
¾ tsp. ground ginger
1 tsp. EVOO
½ tsp. garlic, minced
2 TBSP. corn starch
2 TBSP. water
1½ lbs. boneless skinless chicken breasts
32oz. frozen mixed vegetables (look for the un-sauced stir fry or Asian varieties)
1 c. drained canned pineapple tidbits or chunks (packed in juice or with no added sugar)
3 c. cooked brown rice


  • Pre-heat the oven to 350.
  • Combine the soy sauce, the ½ cup water, the brown sugar, honey, ginger, olive oil and garlic in a small saucepan and cover. Bring to a boil over medium heat. Remove lid and cook for one minute once boiling.
  • While waiting for the sauce to come to a boil, stir together the corn starch and 2 tablespoons of water in a separate dish until smooth to form a slurry. Once the sauce is boiling, add the slurry to the saucepan and stir in to combine. Cook for another minute until the sauce starts to thicken and then remove from heat.
  • Lay the raw chicken breasts flat in a 9×13 casserole dish and pour about a cup of the sauce over top of the chicken. Place the chicken in the oven and cook for 30-35 minutes until breasts are cooked through*. Remove the dish from the oven and shred the chicken right in the dish using two forks.
***While the chicken is cooking, steam or cook your frozen vegetables according to package directions.***
  • When the chicken is shredded and the vegetables are cooked, add the vegetables, pineapple and rice to the casserole dish with the chicken. Add most of the remaining sauce, reserving a bit to drizzle over the top when finished. Stir everything together in the casserole dish until well combined. Return the dish to the oven and cook for 15 minutes. Remove from the oven, drizzle with the remaining sauce and serve.

Tuesday, December 15, 2015

Sugar Cookie M&M Bars

What do I have to blog about today you ask?

Oh, nothing crazy, just these super delicious Sugar Cookie M&M Bars! 

 OMG you guys, these are SO good and absolutely perfect for the holidays!

I made these yesterday and it makes a whole 13x9 pan... THEY'RE GONE!
 Yes, you read right, gone ALREADY! Lol. In our defense, I sent some home with our friends and Mr.Hooah took some to work with him as well!

I found this recipe randomly on Facebook, someone had shared the Betty Crocker Christmas cookie list and these were on it. I was pretty much sold at just seeing "sugar cookie..." and wrote the recipe down to try. I had initially intended on making these to mail back home with some Christmas presents, but hey, every good cook/baker must test it out before feeding it to anyone else... right?! Lol.
I absolutely LOVE soft sugar cookies and these bars are right on the money!
 And by the way, anyone who knows me well, knows that I'm not crazy about M&M's in anything really... whether it be cookies, ice-cream, etc...
(I've just never really been a fan. I guess that must make me the weirdest person on the planet huh?!)
But the M&M's and the white chocolate chips really OOMPH up this simple little cookie!

These would be awesome for cookie-swaps, a quick dessert for a holiday gathering, or even gifting to a neighbor! This recipe is as simple as it gets for "homemade" cookies.
 Give it a try, you wont be disappointed I promise, and I'm pretty sure you'll get no complaints from Santa if you leave these out with a glass of milk!

-XO 

Sugar Cookie M&M Bars
1 pouch (1lb 1.5oz.) sugar cookie mix
1/2 c. butter, softened
1 egg
1 c. red & green M&M's
1 c. white vanilla baking chips   

  • Heat oven to 350°F. Spray bottom only of 13x9-inch pan with cooking spray. 
  • In large bowl, mix cookie mix, butter and egg with spoon until soft dough forms. Stir in 1/2 cup of the candies and the white vanilla baking chips. Press dough in bottom of pan. Sprinkle remaining candies over top. 
  • Bake 22 to 24 minutes or until golden brown. Cool completely on cooling rack, about 1 hour. Cut into 6 rows by 4 rows. Store in airtight container.


Friday, December 11, 2015

Sausage and Tomato Risotto

Risotto...

For some reason "risotto" intimidates people.

Not this girl though! 

I absolutely LOVE anything rice wise, it doesn't really matter what.
 I mean, I am half Korean, could that have something to do with it?!  

Perhaps... 

The first risotto that I ever decided to make was a mushroom-parmesan risotto recipe I found on Pinterest and it was pretty delicious. Since then, I realized that the combos are endless really because rice goes well with almost anything!

I probably look like a serious blog-stalker, I have been looking at and cooking so many of the recipes Emily Bites  has been putting up on her blog lately! Coincidentally, Lol, this recipe is also one of hers and Mr.Hooah & I love this as much as we do all of the other recipes by her that we have tried! 

Although, I do have to say that I think this one, so far, is my FAVORITE! 

The white wine and the rich tomato'ey sausage taste paired with the arborio rice (it is a short-grain Italian rice) which absorbs all those good flavors and pulls this dish together... It is seriously just DIVINE!

We shop on base at the commissary and if you grocery shop on payday, you better get there early because a lot of times they have already ran out of stock of some things, such as the turkey sausage we needed for this recipe.

 Usually, we get turkey sausage, bacon, and ground turkey in place of the regular stuff because it is a way we can eat a little healthier... my newest addiction though is the Hillshire Farm Cajun Chicken Sausage, SO GOOD! 
Anywho, this time we had to settle for Johnsonville Hot Italian sausage...
OH HOT DAMN people! 
It was actually really good and SO AMAZING in this recipe! And there wasn't any bother with removing casings etc... of course Mr.Hooah loved it, so we definitely recommend it! 

Ok, so now back to the whole risotto being intimidating to most people... 
DON'T LET IT! 
Let me be completely honest...
Yes, it sounds super fancy and yes to some it sounds complicated, but you guys... it isn't! It is really just about patience, that's it! Waiting for the liquid to absorb so you can add in more liquid and repeating of the process.
 And oh, what a delicious process it is! Lol. 

You can find the original recipe here Sausage & Tomato Risotto. It is a serious must try and I recommend this for when you want that "MMMMM..." kind of food goodness! Enjoy you guys!

-XO 


Sausage & Tomato Risotto
1 (28oz.) can of diced tomatoes in juice
3 c. water
¾ lb hot Italian turkey sausage, casings removed 
1 small onion, finely chopped
Salt & Pepper, to taste
1 c. uncooked Arborio rice
½ c. dry white wine
9oz. fresh spinach, chopped (I used frozen, that I popped in the microwave!)
½ c. grated Parmesan cheese
2 TBSP. light butter (I used Move Over Butter)

  • Combine the tomatoes and their juices with the water in a small saucepan and bring to a simmer. Turn heat to low to keep the mixture warm until needed.
  • In a large pot or saute pan, combine sausage and chopped onion, add salt & pepper to taste. Cook over medium heat, breaking the sausage up with a wooden spoon until meat is brown and onions have softened. Add the rice and stir to coat the rice and combine. Cook for 1-2 mins and then add in the wine. Stir until wine is absorbed about 1-2mins.
  • Add two cups of the tomato mixture to the rice and stir. Turn the heat down to a simmer (medium-low heat) and cook until liquid is absorbed, stirring occasionally. Add another cup and cook, stirring occasionally, until the liquid is absorbed. Continue, one cup of liquid at a time until all of the tomato liquid has been added and absorbed. Rice will be tender and creamy. Add the chopped spinach and stir in until combined. Cook for another 1-2 mins until spinach is wilted and combined.
  • Remove risotto from heat, add the butter and cheese. Stir until thoroughly mixed. 
  • Serve immediately.

Monday, December 7, 2015

Creamy Pasta with Sausage and Mustard Seeds

Ok guys, I want to start out by saying,
 "OMGGGG! WHAT IS UP WITH THIS WEATHER?!"

Like, REALLY, what the heck is going on? 

One day you can wear shorts out, the next day you need uggs and a sweater! 
North Carolina weather is so unpredictable! 
But I will take this spastic weather over all the usual rain we usually get! I will say that when it gets cold here that it actually gets freezing cold, which makes me want comfort food more than ever this time of year! 
For me, it usually starts around October... you know, the craving for some comfort foods and Thanksgiving type of foods. 

THE STRUGGLE IS SO REAL! 

Don't believe me, ask poor Mr.Hooah, Lol! He has to put up with all my indecisiveness of not knowing exactly what I want to eat... Bless him! 

I always keep an eye out for new recipes, it is a must as Mr.Hooah does not eat leftovers. And lately, I have discovered Coarse Mustard. I don't know what I have been doing with my life all these years without it! Seriously. I ABSOLUTELY LOVE it on sandwiches and I have a recipe to make a cranberry jelly with it (odd combo, I know!) and it is super yummy! I have never honestly thought to put it into stuff like this pasta recipe I am about to share, but Emily, over at Emily Bites did and this recipe for Creamy Pasta with Sausage & Mustard Seeds is amazing! It is filling and the sausage in it kind of makes this fall along the lines of some yummy comfort food for me. It is definitely an unusual recipe, but that's what we like though right?

This recipe is surprisingly easy and doesn't take many ingredients. The mustard gives it a little something extra and we loved how well it all came together! It is actually a little healthier compared to most other pasta dishes you can make, which is a MAJOR plus to me! All the more reason to love this recipe!

 I hope you enjoy this one as much as we did, and I apologize in advance for the photo quality... I was too lazy to drag my camera out for the pics, does that make me a bad blogger? Lol.

-XO!

Creamy Pasta with Sausage & Mustard Seeds


1lb (16oz.) uncooked wheat pasta shells
2 tsp. EVOO
1 ½ lbs hot Italian turkey or chicken sausage, casings removed
3oz. fresh baby spinach, chopped (about a half a standard salad bag, add more if desired, I used frozen chopped spinach that I popped into the microwave as per box directions then drained it)
¾ c. dry white wine
¾ c. fat-free half and half
3 TBSP. grainy mustard (I used Grey Poupon Harvest Coarse Ground Mustard)
Pinch of crushed red pepper flakes
1 c. thinly sliced or chopped fresh basil (I used a few tsp. of dried basil)
  • Cook pasta in salted water according to package instructions. Drain and set aside.
  • While the water is boiling for step one, place the oil in a large skillet or saute pan and bring over medium-high heat. Add the sausage and cook for about five minutes or until meat is cooked through, breaking it up into small pieces with a spoon as it cooks. Add the fresh spinach and stir in. Cook for another minute until spinach wilts.
  • Add the wine to the sausage and reduce the heat to a simmer. Stir together, releasing any brown bits from the bottom of the pan and cook for another 5 minutes until the wine is reduced by half. Add the half and half, mustard and crushed red pepper. Stir together and simmer for another 2 minutes.
  • Remove the skillet from heat and stir in the reserved pasta and basil until well combined. Serve.

Sunday, December 6, 2015

Holiday Photog...it is my FAVORITE!

For those of you who didn't already know, I dabble in photography, it is a hobby and has turned into a little passion of mine.

I have to admit, it is actually a little therapeutic!

I am definitely no professional nor have I been at it long enough to even be considered a "pro", but I absolutely love doing it and I love that I keep getting better and better! 
I am actually pretty proud of the work I do! 
I love being able to be a part of making memories for people and my favorite photos have to be holiday photos such as the ones I am about to share with you guys now... 

This couple was the first couple I had ever shot and I am so far now from where I started then.
The first photos were pretty good for a first timer (the one above is one of them and was from last Fall), but the ones I snapped this past weekend turned out so awesome! I am in love!!!

Not only are these types of shoots my favorite because it is a Holiday session, but because these guys include their pups in all their family photos! 

Uh, pets are FAMILY too people!!! Lol.

This has been my favorite sesh I have done and I absolutely LOVE how these turned out!


Thursday, December 3, 2015

Spinach and Parmesan Orzo

Ok guysss, after all that Thanksgiving goodness, I needed a lighten up! 

I am a couple of episodes behind on Grey's Anatomy...
I know, what the hell have I been doing, right?!

 So, I wanted to make something yummy for dinner and something somewhat healthy to go with these nice steaks Mr.Hooah picked up, to enjoy while I catch up on Grey's!
I have had the steaks marinating away since yesterday in this super easy-peasy Honey-Lime Marinade (it is not just for chicken!) and absolutely CANNOT wait for Mr.Hooah to grill those babies up!

I was making out our 2 week menu plan and I moseyed on over to Emily Bites  
for a little inspiration because I thought my list needed a little oomph! 
Which is how I found this absolutely delicious recipe for her Spinach and Parmesan Orzo.
And as always, I was NOT disappointed! 

Not only does it plate pretty but it is SO TASTY and HEALTHY! 
I absolutely LOVE adding spinach into any dish I can... Mr.Hooah on the other hand, he is picky... so the whole spinach thing is not only for me, but "sneaking it in" actually helps him realize that it can be tasty and that it isn't just a yucky pile of steamed spinach...

 Ok, let's be honest here, I hated spinach growing up too but now that I am older and there are so many new recipes to incorporate it into, and I'm LOVIN' it!

With Orzo, a little goes a lonnng way! 
So it doesn't take much and believe it or not, orzo is actually cheap! 
You can actually mix in a bit of milk, a bit of shredded cheese, and guess what?! 
IT TASTES LIKE MAC & CHEESE!
Yes people, you read that right, macaroni & cheese! 

I have to say that Mr.Hooah actually liked this recipe and I am glad because so do I. 
I actually plan on adding this to our menu rotation! And I always have frozen chopped spinach in the freezer just in case, also orzo in the cabinet, so this is something easy that can be thrown together whenever I need a quick side dish!

 If you haven't (as I have mentioned before) visited Emily Bites, please do so because I promise you'll love her recipes as much as I do!

-XO!
Spinach and Parmesan Orzo 
1 TBSP. light butter (I used Move Over Butter)
1 c. dry whole wheat orzo (regular orzo is fine too)
2 cloves garlic, minced
2 c. fat-free chicken broth 
4 oz. fresh chopped spinach (or 1/2 a pack of frozen chopped spinach, thawed)
1 ½ oz. freshly grated Parmesan (I used grated light-parm in the can & it worked fine too!)
½ tsp. dried basil
½ tsp. Italian seasoning
Salt & Pepper, to taste.

  • In a large skillet or saute pan, bring the butter over medium high heat until melted. Add the dry orzo and stir to coat. Cook for about 2mins until some pieces of the orzo begin to brown. Add the minced garlic and stir together. Cook for an additional minute or so until garlic is fragrant.
  • Add the broth to the pan and bring to a boil (mine was basically boiling right away). Cover the pan and reduce heat to a simmer. Allow to simmer for about 14-15 minutes until the broth is absorbed and the orzo is tender. Stir in the chopped spinach and continue stirring for 1-2 mins until the spinach is wilted. Add the Parmesan, basil, Italian seasoning and salt and pepper, stir together until thoroughly combined. 
Serve immediately.

Wednesday, December 2, 2015

Our Four Year Anniversary

THIS IS LATE... of course, LOL... with all the holiday madness going on (the planets aligned and our anniversary fell on Thanksgiving this year guys!) I haven't had a moment to actually sit down and blog this past week or so! 

Today is a blessing...
 (like everyday is, but today is a little different)
Today I got to wake up next to my best friend, the love of my life, my handsome hooah hubbie...
and tell him Happy FOUR Year Anniversary! 
I cannot explain it, but I can refer to the phrase, 
"Time flies when you're having fun with the one you love!"
It honestly feels like we were married just last November. That we survived the first year that everyone said would be so tough.
Well you guys, let me say that EVERY. DAMN. DAY is tough when you fall in love with someone who is in the military.
 There have been so many trials, obstacles, and some rough patches thrown our way... not many can say they were able to conquer them ither, but somehow our love always perseveres. 
We always assess our situations and we find another way if we come to a wall, we never just give up!

 Seriously though, WHERE DID THESE PAST FOUR YEARS GO?!

I swear it feels like 40 YEARS instead of just FOUR!
I am so lucky that serendipity brought us together... we are opposites but we are alike in so many ways. We support one another and have an unbreakable bond. Being best friends before God finally gave us a little push in the right direction to fall in love, means more than anyone could ever know. I am so thankful and blessed to have such a great guy in my life, someone who is so selfless, who puts me first above everything else.. someone who supports me and everything that I do 1500%.. who just makes life easier. I am so proud of how far we have come and how much we both have changed for the better... It is amazing to know at the end of the day we're still as in love as we ever were and that he is my person and I am his!
I am going to keep this one short to spare all of you the mushy-gushy, lovey-dovey madness...
So I'll end here with a huge,
 HAPPY ANNIVERSARY MR.HOOAH, I love you more than words can say and I will forever promise to remember that neither of us are perfect but that we are perfect for one another and to love you as fiercely as I can....Thank you for all that you do for me, for us, for our future, and for always bringing me cheesecake when you know I need it and for always encouraging me to chase my dreams! And as always, Me & You, Just Us Two babe!
-XOXOXOXO!