Saturday, September 1, 2012

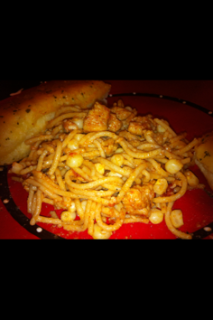
Chili Chicken & Pasta

As ALWAYS, I look for new recipes to add to our weekly menu. I found a recipe in my stash that has gone unnoticed for as long as I've had all of my random clippings. I do not know which magazine it can from but kudos to whichever! I decided to give it a try after my sister picked it out of the bunch. THIS was a hit! I liked the fact that it is a light dish & that it is simple & easy! I did a few altercations & it still turned out great! I used wheat pasta, added a little extra EVOO & a heavy hand with the chili powder...it turned out deeee-lish! I pulled this from the pile to add to our favorites so it will definitely be cooked again! (:
 
Chili Chicken & Pasta
 
Photobucket

6oz. angel hair pasta
3 ears fresh corn, cut from cobb
4 small skinless boneless chicken breasts, cubed.
1 1/2 tsp. chili powder
1/4 cup GOOD olive oil
3 Tbsp. lime juice
1 can petite diced tomatoes, drained.
(I used hunts italian seasoned)
 
Cook pasta in boiling salted water according to package. Cut corn from cobb; add to pasta last 2 minutes of cooking. Drain; rinse with cold water.
 
Meanwhile, sprinkle chicken with 1tsp. of chili powder and 1/4tsp. each salt & pepper. In skillet, cook chicken in 1Tbsp. hot oil over medium heat 8-10 mins or until chicken is no longer pink, turning once. Mix in tomatoes while still warm to heat tomatoes.

Combine remaining oil, chili powder, lime juice in with tomatoes & chicken, mix well. Then in large bowl mix the chicken mix with the pasta until well blended.
***also can sprinkle with parm cheese, makes it yummier!!!
Photobucket
 

Friday, August 31, 2012

Why I have been MIA lately & FACEBOOK!

Ok, so my life has been insane in the past 21 days since my last posting...dare I even explain?! I have been doing some house work, MAJOR cleaning, PAINTING=oh how I loath thee..free-handing a paris theme in my sisters room & then using some leftover safari stuff & repainting my plain ol' jane tanningbed/workout room, helping Mr.Hooah take down & put up new glass storm doors, trying to get my sleep habits organized( can we seriously say 'insomnia'?! staying up until WAYYY after Mr.Hooah reports to PT & formation around 0500 is literally draining me! I seriously feel like I'm housewifing on 3rd shift lol), adapting to our newest addition Mr.Hooah's new big H.U.G.E baby(a dalmatian-great dane mix (see pic below) 10month old pup), & taking care of my wittle wookie Kizzie...she's had kennel cough & she is like our little daughter...it breaks my heart to see her so sick! I told Mr.Hooah that if this is what it's like to have kids, I'm going to be one of those SUPER worried moms that freak out over the tiniest bump...I'm going to be one of those mom's that everyone see's carrying around a first-aid kit lol! But that is pretty much where I have been, it has been a freakin roller coaster of insane in the membrane-ness that just makes you think, "Is it ever going to be normal"?! SO I have several new recipes & a few crafts that I have been meaning to post just couldnt bring myself to open my computer for even a minute because I was doing 9,000,000 other things lol but I promise I'll be back within a day or two! (:
I did manage to get my facebook link working again:
Make sure you like the page so you can get updates there as well for my GIVEAWAYS that are soon to come, I have found some pretty awesome sponsors with some pretty neat stuff!(:


Friday, August 3, 2012

Easy 'Peasy' Hummus!

Guess who's back...Back againnn! Haha! So, I've been away for a hot minute & I apologize..I'm sorry but I was having some MUCH NEEDED family time back home in Alabama with Mr.Hooah & my little sister Randa-Panda! While there, I swear I gained 50lbs!!! My aunt & uncle loves my pasta dishes as much as we do & though I was supposed to be on "VACATION" I found myself cooking 2 very heavy time consuming pasta dishes! We also indulged in the sweets/JUNK food that my aunt keeps EVERYWHERE in her kitchen! Danishes, Poptarts, Chocolates, Cake, Peanut Butter Rice Krispie Treats, Burritos, Pizza Rolls, & D. ALL OF THE ABOVE! See, we DO NOT keep stuff like that here in the house, so Mr.Hooah thought he had crossed those pearly gates in HEAVEN, eating the previous BACHELOR food that he'd almost forgotten about! (he swears he loves my cooking more tho lol, I said nice way to earn a brownie point!) So, while home we splurged on home decor & sweets, & now its back to the normal life! At the commissary the other night, we were looking for our favorite flavor of hummus & they didn't have it, also the ones they did have were quite pricey for just plain ol' hummus...& if u haven't guessed it already, YEP! I decided to MAKE MY OWN! It's creamy, EASY, yummy & oh-so-good for you & BEST part?!?.. You can season or add things to customize it anyway your little taste buds desire! This was so delicious, Mr.Hooah & I love it, even my 'picky-pete' of a little sis likes it! I like to save all of my plastic butter, sour cream, chinese take-out containers due to Mr.Hooah always bringing them back corroded or never bringing them back at all & so I send his lunches out in those instead of my good tupperware...& the recipe filled up TWO of my recycled SABRA hummus tubs.....that's TWO TUBS that only cost me for the $1ish I spent on the peas! Which is way better than paying $3-4 for just ONE tub of hummus! (:

EASY 'PEASY' HUMMUS
Photobucket

1(15oz) can chick-peas, drained
3 Tbsp. lemon juice
2 Tbsp. water (it didn't have the consistency i was looking for so i added the amount of water until i found the consistency i wanted!)
1 Tbsp. olive oil
1 tsp. minced garlic
1 tsp. salt
1 tsp. each: ground cumin, paprika, white pepper or any other hummus spice you might like!
**I also used 1 handful fresh, chopped baby spinach..& 2-3 slices roasted red peppers**

  • Combine all ingredients in a blender or food processor & blend until smooth. 

Tuesday, July 17, 2012

DIY Swiffer WetJet Refills

This is probably going to be the last post I get in for about a week & I was so thrilled that I just had to share this...I am more than POSITIVE that I am SUPER behind on this..I'm sure someone is out there reading this like "Psshhh girl, I figured this out right after I bought mine, get with the crafty program!", but then there may be a few others that are on my level & a wee bit behind too! (: I have been trying to get the house clean & all the clutter(i.e...the tornado of puppy toys---our pup Kizzie, no joke, is Toddler Status! the pillows that always seem to get thrown off the couch, the random cups Mr.Hooah 'forgets' to take to the sink, the 8 pairs of sunglasses he has lying around or stashed here & there--he has to wear due to profile from the Lasi'k' eye surgery he had to have done on his lovely German peepers, he goes to his next appointment tomorrow & I'm hoping he will be free from shades & off profile for good!--& lastly all the ACU's that Mr.Hooah has strewn throughout the house...apparently he still doesnt know where the laundry basket is haha!) put away before we go back home on his block leave. Idk about you guys, but I LOVE to come home to a mess-free house when I get back from a long vacation! And man, do I ADORE my swiffer wet jet! However, I DO NOT adore the prices of refills because I use my swiffer too much to pay those prices! I cannot tell you how many times I would just toss the refills in my cart & think, Dude, theres soooo gotta be an alternate brand to buy or a way to make my own...So on pinterest I stumbled across a DIY refill. I was like Ok, lets do this & hopefully it works! This being a test, I used my mini-bottle that came with my swiffer when I got my new one. So, does it work you ask? You bet your sweet Auntie Emm it does!!! Hahaha...so GOOD-BYE expensive-priced-doesnt-really-smell-or-clean- that-well swiffer refill solution & HELLO my wonderful fresh smelling do it FREE myself refill...cleaning with the POWER of Pine-Sol baby! Haha! (:
How to: 
Photobucket
Bring a small pot of water to a boil then immerse cap for about 10-12 seconds.
sr1
Now twist off the top with a towel.
Photobucket
Photobucket
And fill with your favorite cleaner & some water...haha Beenie in the background making his dayview!
Photobucket
Screw the cap back on & make sure its on there good! How stinkin easy & cheap is this?! Now go swiffer til your hearts content!

OH THE POWER OF CLEAN!!!!

Photobucket
Photobucket

$2 Moss Letter Frames...

So, I keep seeing these moss letters everywhere & I have had it on my to-do list for a while & just now getting around to it. Since it was my 1st go at it, I didn't want to spend a lot of money because I wasn't even sure if I would like it once it was finished. I passed a big bag of Moss while in the DollarTree & decided, heck, why not! So I grabbed it, & a spool of ribbon. Call me Frugal-Francis, but I didn't even want to spend the dollar or two on the cardboard or wooden letters, so I cut up a cardboard box I received an Ebay item in & it worked just as well! I already had these frames(from the dollartree as well) stashed away here at the house so the total cost was only $2.00 & I'd say they look OK for crafty cuteness on the cheap! I'm going to be giving one to my Mom & Aunt when we go home for a week on Mr.Hooah's block leave! I am SOOO happy to be going home to see my family, I've missed them very much so & I know Mr.Hooah is excited STOKED to be getting a small break from playing army for 2 weeks! He says he's ready for the BBQ'ing, laying out by the pool with a few beers, sleeping in past 0400 & spending quality time with me...isnt he just the sugary-est? Haha. I will be MIA for a week or so...I'm literally from the sticks...cue the BANJO music now...joking. HaHa. So I will not have good net connection to blog!(:

$2 Moss Letter Frames

What you need:

Crafting Moss
Scissors
Glue
Cardboard
A GOOD pen!
Ribbon
Picture frame
Photobucket
First, draw out your letter shape however you like then cut it out & cover with glue.
Photobucket
Cover the letter in moss & let it dry!
Photobucket
Remove the glass & backing off of your picture frame.
Photobucket
Now cut off the amount of ribbon you want to use; enough to tie a bow at the top & enough to make a nice tail.
ml7
Wrap the ribbon around your letter & attach to your frame.
Photobucket
Here's my finished product! I was pretty happy how they turned out, I had a little more ribbon on one, it was the last on the spool & I hated to trim it down & waste the pieces. Made one for the Hooah house, one for Mom's, & one for the Aunt's house to take back home on Mr.Hooah's leave this week!(: