Tuesday, July 17, 2012

DIY Swiffer WetJet Refills

This is probably going to be the last post I get in for about a week & I was so thrilled that I just had to share this...I am more than POSITIVE that I am SUPER behind on this..I'm sure someone is out there reading this like "Psshhh girl, I figured this out right after I bought mine, get with the crafty program!", but then there may be a few others that are on my level & a wee bit behind too! (: I have been trying to get the house clean & all the clutter(i.e...the tornado of puppy toys---our pup Kizzie, no joke, is Toddler Status! the pillows that always seem to get thrown off the couch, the random cups Mr.Hooah 'forgets' to take to the sink, the 8 pairs of sunglasses he has lying around or stashed here & there--he has to wear due to profile from the Lasi'k' eye surgery he had to have done on his lovely German peepers, he goes to his next appointment tomorrow & I'm hoping he will be free from shades & off profile for good!--& lastly all the ACU's that Mr.Hooah has strewn throughout the house...apparently he still doesnt know where the laundry basket is haha!) put away before we go back home on his block leave. Idk about you guys, but I LOVE to come home to a mess-free house when I get back from a long vacation! And man, do I ADORE my swiffer wet jet! However, I DO NOT adore the prices of refills because I use my swiffer too much to pay those prices! I cannot tell you how many times I would just toss the refills in my cart & think, Dude, theres soooo gotta be an alternate brand to buy or a way to make my own...So on pinterest I stumbled across a DIY refill. I was like Ok, lets do this & hopefully it works! This being a test, I used my mini-bottle that came with my swiffer when I got my new one. So, does it work you ask? You bet your sweet Auntie Emm it does!!! Hahaha...so GOOD-BYE expensive-priced-doesnt-really-smell-or-clean- that-well swiffer refill solution & HELLO my wonderful fresh smelling do it FREE myself refill...cleaning with the POWER of Pine-Sol baby! Haha! (:
How to: 
Photobucket
Bring a small pot of water to a boil then immerse cap for about 10-12 seconds.
sr1
Now twist off the top with a towel.
Photobucket
Photobucket
And fill with your favorite cleaner & some water...haha Beenie in the background making his dayview!
Photobucket
Screw the cap back on & make sure its on there good! How stinkin easy & cheap is this?! Now go swiffer til your hearts content!

OH THE POWER OF CLEAN!!!!

Photobucket
Photobucket

$2 Moss Letter Frames...

So, I keep seeing these moss letters everywhere & I have had it on my to-do list for a while & just now getting around to it. Since it was my 1st go at it, I didn't want to spend a lot of money because I wasn't even sure if I would like it once it was finished. I passed a big bag of Moss while in the DollarTree & decided, heck, why not! So I grabbed it, & a spool of ribbon. Call me Frugal-Francis, but I didn't even want to spend the dollar or two on the cardboard or wooden letters, so I cut up a cardboard box I received an Ebay item in & it worked just as well! I already had these frames(from the dollartree as well) stashed away here at the house so the total cost was only $2.00 & I'd say they look OK for crafty cuteness on the cheap! I'm going to be giving one to my Mom & Aunt when we go home for a week on Mr.Hooah's block leave! I am SOOO happy to be going home to see my family, I've missed them very much so & I know Mr.Hooah is excited STOKED to be getting a small break from playing army for 2 weeks! He says he's ready for the BBQ'ing, laying out by the pool with a few beers, sleeping in past 0400 & spending quality time with me...isnt he just the sugary-est? Haha. I will be MIA for a week or so...I'm literally from the sticks...cue the BANJO music now...joking. HaHa. So I will not have good net connection to blog!(:

$2 Moss Letter Frames

What you need:

Crafting Moss
Scissors
Glue
Cardboard
A GOOD pen!
Ribbon
Picture frame
Photobucket
First, draw out your letter shape however you like then cut it out & cover with glue.
Photobucket
Cover the letter in moss & let it dry!
Photobucket
Remove the glass & backing off of your picture frame.
Photobucket
Now cut off the amount of ribbon you want to use; enough to tie a bow at the top & enough to make a nice tail.
ml7
Wrap the ribbon around your letter & attach to your frame.
Photobucket
Here's my finished product! I was pretty happy how they turned out, I had a little more ribbon on one, it was the last on the spool & I hated to trim it down & waste the pieces. Made one for the Hooah house, one for Mom's, & one for the Aunt's house to take back home on Mr.Hooah's leave this week!(:

Friday, July 13, 2012

Why am I up so late & Undone Stuffed Bell Pepper Casserole!

As I think Ive mentioned before, THIS lil' Korean, ME! has had such a horrid time sleeping...Its almost feels like a bad Stephen King movie but with the title Insomnia. I CANNOT seem to get in bed early & sleep the whole night through...like now, I am up @ 0230 & I'm only a tad bit sleepy & I've been going at it all day. I'm extremely restless, hot, & uncomfortable! So I decided that since I have been slacking, I needed do something good with my awake time & post something! We LOVE green peppers & I honestly ALWAYS have these on hand because I put them in most everything I cook...along with mushrooms & onions. I try to make things we eat as healthy as possible & make it have a serving of veggies included...Mr. Hooah says that I own stock in those 3 veggies! HaHa! So tonight we weren't really in the mood for what was listed on our menu, so we switched it up & made this recipe that I got somewhere online..I cannot recall where but I know the original recipe is not one of my own, so KUDOS to whomever or where ever I got this one lol..I've been holding onto it for a while now & just getting around to cooking it.. this was DELISH & I tried to make it as healthy as possible & altered some items in the recipe, it still had just as much flavor & we all really enjoyed it & it was super simple!

Undone Stuffed Pepper Casserole
 1 lb. lean ground beef
(I used turkey burger)
2 large green peppers, chopped.
2 Tbsp. garlic, minced.
2c. cooked white rice
(I used brown rice)
1(24oz.) can spaghetti sauce
(I used Hunt's Garlic & Herb)
1 1/2 c. Mozzarella cheese
---and I added 1 small onion, diced.
Photobucket
Photobucket
Photobucket
Yep, you guessed it, I also made Rutabaga's--top right corner...I passed by them at the commissary & was shocked to find actual Rutabaga's so far north, I thought it was only an old southern thing, but there they were! My granma & I used to LOVE these, she'd pick turnips & cook these up too, however, Mr.Hooah had never had these so when I cooked them tonight, I got a GOOD laugh...I didn't tell him what they were I just put them on his plate & moved to the next item, when he sat down at the table he had a funny look & upon poking them around with his fork, asked: "Are these those.....Ru-Chu-Coop-Rah-Cod-Uh's?!?!" BaaaaaaHaHa...I have NO clue where he got that, but, OK!....the sister & I nearly had him wearing our Lemonade!

  • Heat oven to 350'.
  • Brown meat, garlic, & veggies..drain.
  • Stir in sauce, rice, & 3/4 cup of the cheese.
  • Spoon into 2qt. casserole dish & top with remaining cheese.
  • Bake 25mins or until cheese browned. 


Sunday, July 8, 2012

FREE YEAR Subcription to BHG Magazine!

SO GOOD I HAD TO SHARE!!!!!!!
GO HERE TO ENTER FOR A WHOLE FREE YEAR OF BHG MAGAZINE! WHAT AN AWESOME DEAL! TY SAVVY-SPENDING! & IF YOU HAVENT ALREADY, ADD HER, SHE ALWAYS HAS AMAZING SAVINGS TO SHARE!!!!(:

Wednesday, July 4, 2012

Wordless Wednesday...

mylovie25555
Mr. Hooah in Iraq...Land of the free because of the BRAVE!  Thanks to my husband & ALL of the other military & families who serve & support!!!
Happy 4th & everyone be safe!!!(:


I WON my FIRST giveaway! Thank You Little Yellow Barn!

I admit, as I always do, I am very late posting...but I want to share my win with you guys! Back at the beginning of May, someone had made up a linky for all of these super awesome giveaways & I went to several of them & entered! I was a lucky enough to have had my name drawn from one of my favorite give-a-ways that I entered....
  I fell in love with them when I saw them & it was the first give-away I entered & the only one I won, so I am pretty darn happy to share this with you!
The Vogue Vintage Valuables from:
Little Yellow Barn!
Little Yellow Barn
  If you havent already, you have GOT to swing by & check out Little Yellow Barn, they have some unique crafty ideas, recipes, & check out the etsy shop as well!(:
Photobucket
I was STOKED when the UPS guy dropped these off, I seriously almost attacked him through the door haha I think I might've even scared him a little lol!
Photobucket
And the excitement continues!
Photobucket
Oh how I do so LOOOOVE these!
Photobucket
I wanted it to be arranged a little differently so I just put them all over & I loved that they tied in with my clock(:

Tuesday, July 3, 2012

Powder Room Redo

I am SO thrilled that my powder room is FINALLY finished! This was definitely a challenge...I must tell you, Mr. Hooah & I are complete opposites when it comes to...well, I'm not EVER supposed to speak this word, but, "spending"...so, when we moved from our rental, the previous renters had left some junk, so when we moved in we only kept what we wanted which happened to be the only things worth keeping: a well used charcoal grill & a wooden ladder that seemed ok because we never used it to know otherwise, until we moved into the house we just bought...I think somewhere between up the ladder, almost falling off the ladder(SEVERAL times), down the ladder, & all the odd uncomfortable positions I found myself in while on the ladder for pretty much 4 days...that rickety @#$^&*^%!  rack of wooden steps & I, developed a beautiful love hate relationship. (MOSTLY HATE!) Thats where the 'I don't think we need to spend $$$ on a NEW ladder when this one is just fine babe, its not falling apart, its just got character'...Pshhhhh! I'm LUCKY I got away without any broken bones! If that darn thing had character, then I'd compare it to Dopey from Snow White! lol. I got my inspiration from a photo a hot minute ago, it was a room by Lilly Pulitzer with cursive writing all over the walls like this:
Photobucket
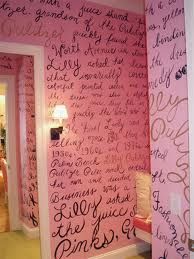
Since I saw that pic, I've wanted to do this to a room in my house for like, EVER! So since we finally bought a place, I'm finally able! Our bedroom colors are black & white damask & I'm completely freakin IN LOVE with the mayor's office from the show 'Once Upon A Time' on ABC, so I wanted to do the tree/forest stencil in our bedroom to match up & kinda still do my own version of the mayor's office...but put your breaks on....I wanted to work from the inside out: our bathroom, the powder area right outside it, & then our bedroom last. So when I finally got to the powder area, we decided we wanted it to match the bedroom since it was an open-connected area. So we painted both the bedroom & powder area a custom grey color I had mixed & then my BRIGHT idea!!! Paint the powder area like the pic above! It was a brilliant idea atm, however, after 5 repaints of grey before I finally got the feel of the brush & my calligraphy from highschool art class finally broke through, it quickly became a seemingly BAD idea lol! **KEYNOTE: it is WAY harder to free-hand calligraphy with a paint brush than a pen!!!** So after 4 days of tediously freehanding with a small brush, from about 6pm-3am due to sporadic insomnia, stopping & starting, for 4 days...with quotes from my 3 FAVORITE girls: Audrey Hepburn, Marilyn Monroe, & Coco Chanel... I'm VERY proud to show it off...this is what I ended up with! Oh & a bad case of triple carpal tunnel! haha(:
Before:
Photobucket
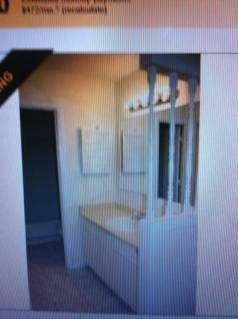
Sorry it isnt a good pic, this was the before, before we even bought the place lol
After:
I still have some trim touching up to do(:


Photobucket
Photobucket
Photobucket
Photobucket
Photobucket
Photobucket
Photobucket

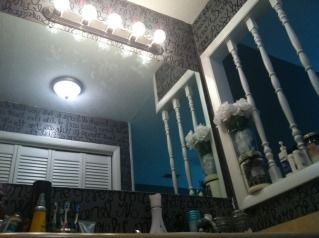
I scored this crystal chandelier on craigslist for $25 & gave it the cleaning it deserved...Mr.Hooah even managed to install it himself, WITHOUT burning the house down haha!  
Photobucket
Photobucket
pr12
pr13

Monday, July 2, 2012

Skittled Vodka

Well, apparently I must be a little behind with the times...when browsing to go from brunette to blonde on youtube, I stumbled upon a girl that was DIY brunette to blonde from a box, I kept watching her makeup tutorials & then BAM! She randomly had a tutorial on how to SKITTLE, yes, SKITTLE......VODKA! Wait, WHAT?! Did my eyes & ears deceive me?! Could it be true?! Oh yes...Two items on my FAVORITE things list! So, without even realizing I dialed the number, I told Mr. Hooah to grab two big bags of skittles & a bottle of vodka on his way home HaHa! So, apparently, if you want to 'Do It Big' you should buy a bottle of vodka for each color of the rainbow...however, I ONLY like the RED ones so we opted out of 'doing it big'! It was actually quit delish, the sugar does make the vodka extremely heavy, but I liked it even tho.

What you need:
1 bottle of Vodka of choice
2 Large bag of Skittles
Photobucket

Taste the RainBow:
Photobucket Photobucket

Photobucket
(Smirnoff was obviously on sale, because this is what Mr.Hooah came home with..the best vodka to do this in is honestly ABSOLUTE Vodka...just my opinion because it taste better, is higher quality, & FEWER CALORIES!) 
Just pop in the skittles, you will have to make a little room for the skittles, so I poured the excess Vodka into another bottle as I dropped in the skittles & it became too full...make sure to give it a good shake about every 30mins or hour to make sure the skittles are being moved so they wont stick to the bottom, plus it helps break them down...leave in refrigerator over night...We did some shots(it is SUPER sweet btw) then my Jerseylicious friend Lex & I, who is also a bartender and an ARMYwife, decided we would try to mix it with some Strawberry Daiquiri Mix & I cannot tell a lie, it was pretty darn scrumptious! (:

Craigslist Kitchen Table Redo

Photobucket
So, as I mentioned before, I am ADDICTED to Craigslist...when you are stationed on or around a military base, you would not believe the DEALS you can find...mostly from people moving in or moving out. I have been looking for a larger kitchen table for our dining room...when I lived all Miss Independent, my kitchen, actually my whole house, was EXTREMELY small...so with that being un-exaggerated-ly said, I just had a two-person breakfast table, that we decided to save money & reuse since it was mainly just the two of us & mostly because he has been living in the barracks since he graduated & joined the Army when he was 17...so thank god I had all of the house furnishings! Lol. I have adapted a serious addiction to Craigslist & I usually check it in the mornings while I drink my coffee. I have been meaning to post this & several other re-do's that I have been up to, since..........well, yeah, FOREVER ago & am just now getting around to it...yes, I know, shame on me! ;) Any ways, here is the high-table I found for $30 because it only had 3 chairs, that's why she asked so little for it!
Photobucket Photobucket Photobucket  
 I honestly can't believe I found this for only 30-buckaroo's! I must say, that definitely needed a little TLC & I was more than happy to volunteer....well at first anyways lol...it became a MAJOR pain.. ooooh the words I spouted out that the garage may never recover from...& I'm pretty sure at one point I may or may not have actually gave it a kick! I wanted to do a quick tabletop fix so I found Krylon Hammered Metal & I tried that...from my sister not shaking the can well enough, the color at the bottom of the can left a huge color mark...so then I thought I could camouflage it by using some of the pewter metallic faux glaze I had left over...so I painted over & wiped & painted over the spot some more & it was HORRID, then with spiteful defeat, I said to heck with it & decided to just spray on a clear coat & call it a day...& whatta ya know, this table wasnt finished with me...the clear coat was blotchy & at this point, I for sure recall telling Mr. Hooah to help me chunk it out by the curb, obviously he refused haha!(: So another trip to Lowe's & 3 coats of polyurethane later, I'm pleased to say that I actually love the way it turned out...it kinda has a dark wood-grain look with a bit of shimmer & I went with a customized black on the legs & also on the chairs. Its just perfect for our lil dining area! Mr. Hooah also threw in a "See there, you made it awesome, aren't you glad we did'nt chunk it to the curbside." hahaha(:
Photobucket
  PhotobucketPhotobucket 
PhotobucketPhotobucket
And of course, the pups had to make their day-view in the pics too lol...